Robot Waltz
Rebecca Shen
Stephanie Bentley
Allison Moore
Overview Video
The Plan
For our ME35 (Intro to Robotics Spring '21) final, my group (me, Stephanie & Allison) was tasked with building and programming robots in order to dance the Viennese Waltz.
The requirements included:
1. Robots should dance the Viennese Waltz with a partner
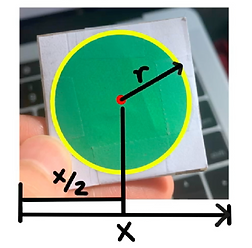
3. Robots should proceed in a clockwise direction along
a large circle (shown to the right)
2. Robots should start and stop with the music
Using this list of requirements as a guide, we were left with a couple of questions:
-
How does a robot waltz?
-
How does a robot move synchronously with a partner?
-
How can we detect music?
...and, our greatest challenge...
-
Can three robots waltz?
Our solution:
We will build three robots- two leaders, one follower - with two robots dancing at a time with the leaders switching out.
Waltz Pattern

System Architecture
(created by Stephanie!)
Above is a system architecture diagram that visually represents each robots' individual components and how they connect and interact with each other and the external environment. Each one of us was responsible for our own robot and each specialized in a specific aspect of the project, but we spent most of our work sessions physically together in order to bounce ideas off each other, support each other and overall better integrate our designs.
The rest of this page will break down our design process into the main parts-robot design, waltzing, image detection and processing, sound processing-ending with how we put it all together!
Meet The Robots
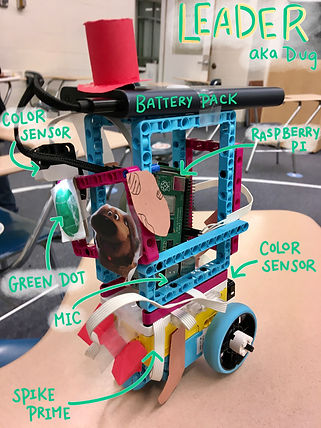
These are our robots, all dressed up and ready for a ball! Our robots' appearances (and behaviors) are inspired by the characters from the Pixar movie, "Up."
One of the fun aspects of this project was how open-ended it was. Being a group of 3, we brainstormed many different ways of achieving a three-robot version of a waltz that historically only involves two dancers.
In the end, we wanted to develop three robots that told a story, and that story ended up being the sweet friendship among the boy, the bird, and the dog from "Up".
The Story
Now, how exactly do cartoon characters fit the dynamics of a waltz?


Kevin the bird is a natural leader. She spends her days scrounging for food to feed her children- a loving mother, a loyal friend, and a dangerous foe.
Russell is just at the beginning of his life journey- he's curious, loves animals, and is fiercely loyal. All characteristics of a steadfast follower.
Dug the dog is the underdog of the group (pun intended). By the end of the movie, he has established himself as a true leader with a heart of gold.
All jokes aside, we thought the dynamic among these movie characters fit well with the colorful and cheerful atmosphere our robots create, as well as supported our incorporation of three robots in a two robot waltz.
Part I: The Waltz
Goal
One robot will adopt the leader role, equipped with a color sensor to line follow, ability to spin, and can complete both tasks independent of the other robot. The other robot will strictly focus on following the leader's dancing through either physical attachment or visual detection.
Approach
Robot partners should line follow a large circle counterclockwise along other robot duos while simultaneously completing smaller rotations within their own partnerships.
At the start of this project, we deliberated over which waltzing approach would yield consistent results, efficient code execution, and the most 'graceful' waltz-like movements. From our previous robotics projects this semester, specifically the Crazy Races line following car race and Webcam Car, we knew that we could achieve line following through color detection + proportional control, and we could rely on motor pwm functions to control rotation. However, many environmental factors can affect the consistency and success of line following/motor controls: lighting conditions affect color readings, surface friction can offset rotation radii, hardware response to code is not always 100% accurate, etc. Therefore, we chose to only program one leader robot with the waltz steps in order to increase reproducibility of consistent waltzing and to mirror the leading and following dynamic present in human waltzing.
We broke up the waltz into three sections: the big spin, the small spin, and the follower, with myself focusing on the follower.
The Big Spin
Coding the big spin allowed us to revisit and improve on our line following code from the Crazy Races assignment as both incorporate the same fundamental skills: color detection and proportional control.
The video on the right is an early version of a single dancer attempting both of the spin elements using a bang-bang controller. In order to recreate the final waltz conditions, we created our own version of the large 'circle' and had to improvise a bit given we only had black tape and dark hardwood floors.
We later found that the bang-bang controller did not achieve the smooth waltz movement we wanted, and switched to a proportional controller.
Footage from April 13th
The Small Spin
The Follower
We considered a few options on how to incorporate small spins while still progressing along the larger circle. We first thought about making the robot consistently completing smaller rotations while simultaneously progressing along the larger circle, which is more representative of the Viennese Waltz technique. However, we soon found it was difficult to control rotations that were not perfectly circular, and decided on the following:
The robot will progress x distance along the larger circle, spin a small circle with a set radius, and then find the line again and continue.
The follower was an interesting challenge. It was clear to us that physically connecting the leader and follower using Lego would yield the most consistent following results- we would not have to worry about tracking down a wandering following robot.
However, because we wanted to leave the option of adding a third robot open, and we did not want to have a trio of robots waltzing at the same time, we decided to implement some sort of image processing and detection, taking inspiration from our face tracking teleprompter midterm.
I knew that I could identify an object/face using image processing and then utilize proportional control to control the follower's position.
This led me to my main challenge/task at this stage in the project: what is the most efficient/consistent image processing method I can implement and how can I test that method's efficacy?
Option 1: Face Tracking
I decided to start with a form of image detection and following I had utilized in my midterm teleprompter project: facial detection using a Haar Cascade classifier. I remembered facing issues with lag and inconsistency due to lighting conditions but wanted to use this as a proof of concept.
The video on the left shows the follower robot somewhat consistently tracking my professor's face.
Option 2: Shape Tracking
Footage from April 13th
One notable challenge was figuring out how to integrate the two robots. Since we ended up utilizing three proportional controllers across two separate robots, it became quite the balancing act. How much do we adjust only one or the other? How long can we rely on trial and error before it becomes repetitive and improvement plateaus?
What We Tried: Write our code in a way where it's easy to incorporate future adjustments, understand when to adjust hardware vs. software, and communicate with each other!
While the face tracking was mildly successful, the lag present was not worth the added complexity. This was the point where I realized that the more complex solution is not always the most efficient and I wanted to search for a simpler method that yielded more consistent results, hence the segway into image shape processing.
Part II: What Is Green?
Goal
Follower robot should use Python OpenCV image processing to detect green dots present on the leader robots and apply proportional control to follow the dot, and thus the leaders.
I will first calibrate and find the appropriate green HSV values and use a combination of image processing functions to identify the green dot using the Raspberry Pi camera. Then, I will compare the center x value of the dot to the center x of the image frame in order to keep the follower squared directly behind the leader, and use the circle's radius value to make sure the follower doesn't crash into the leader.
The next phase of the project required refining the fundamentals we established in Part I. While the rest of my group worked hard to improve the leader codes, I spent a majority of the time improving the follower's image processing.
The Green Dot
Why a dot?
The main appeal for tracking a green dot, as mentioned before, lies in its simplicity for both image processing and proportional control. Instead of implementing facial tracking, I can just create a mask over pixels with HSV values corresponding to green. This would also greatly reduce the webcam lag that occurs with Haar Cascade. Add some extra threading on top of all of that, and I would hopefully have an efficient image detection code.
In order to follow the leader, I wanted to control two aspects of the robot's motion:
-
proportionally control motors to turn left/right in order to keep the dot in the center of the frame
-
proportionally control motors to move forwards/backs/stop to keep up with the leader at a reasonable distance
A circle is perfect for this because you only need two points to make a circle: the center value and the radius, both of which I could extract when masking the dot. I would use the cetner value to adjust the robot's left/right positions, and the radius to adjust distance. No need for slightly complex math that adds lag!
Identifying and Following Green
Calibration Process Using HSV Value Sliders and Testing Various Locations/Lighting

Finding HSV values using sliders

HSV values from around the classroom
I started off using green HSV values someone had posted on the internet, which I quickly found only worked under certain light conditions. This issue reminded me of the color detection problems I faced when working with the color sensor and I came up with two solutions:
-
Calibrate green values at different locations in the classroom where the final waltz takes place
-
Add a light source above the green dots on the leader robots to better control lighting conditions. (Eg. the color sensor above the green dot on Dug the leader robot.)

However, even after implementing the two solutions above, I realized I had overlooked a major detail: the Lego pieces itself could be perceived as a blueish-green under some lighting, and the Raspberry Pi is green. The image on the left shows an instance of the code identifying the body of Kevin the leader robot as a green dot. Additionally, during the final waltz, there were some green objects in the room that lured the follower robot away. Although, I do not have a current solution for this (perhaps inventing a new color unlike all others), the video below shows that although the follower robot was not directly behind the leader at all times, especially during turns, the detection was pretty reliable.
One last challenge I will note was figuring out how to find the green dot if it went out of frame. Up until the final waltz, we had to adjust the turning speed and radius of the leader robot to make sure the follower could keep up. In order to alleviate this, I added code that saved the previous dot center x value, and if no contours were found, the robot would spin either CW or CCW in place depending on the location of the previous value with respect to the center. This improved the follower's behavior significantly.
Footage from April 21st
Part III: Music Detection
Goal
Follower robots should utilize machine learning to detect the presence of music and move appropriately in response.
Incorporate a 1D Linear Classifier. The code creates a music on/off threshold based on live readings of audio data, compares audio values to that model with the threshold, and then either sends the music status to the Pi using the model or through user input.
Footage from April 19th
The video on the left shows a leader and follower robot moving in response to the presence of music.
The main challenge with music detection was finding the right music on/off threshold. Often, the audio values for music and ambient noise were very similar in magnitude, making it hard for the robots to accurately distinguish the music status.
Although this aspect of the project was not my main focus, I was able to learn a lot! First, the class material and individual explorations of using KNN and KMeans to train my robot let me gain some basic understanding and experience using machine learning. Second, acting as a soundboard for Stephanie and Allison, and watching them refine their code and hardware designs taught so much!
Part IV: The Switchout
Goal
Incorporate third robot as a second leader through a switchout.
When the current leader robot detects red during the big spin, it will exit the circle and the third robot will enter as the second leader, continuing without causing the follower to stop.
Footage from April 18th
Once we were confident that we could get two waltzing robots working, we started thinking about how to incorporate the third robot. Earlier in the process, we had agreed to make the third robot a leader robot for a few reasons: it would be easier to incorporate some environmental cue (eg. detect red) on the leader, we could easily adjust the distance the follower was from the leader allowing for a less disruptive switch out, and it made sense to add a few lines of code to the SPIKE line following code on the leader.
We chose to use a color cue as the leader robots would already be color detecting for the line following and a red piece of paper would be an easily distinguishable signal. Ideally, we would have small pieces of red tape at locations around the circle where we would switch out, but that would have inconvenienced the other groups' robots, leaving a future challenge of how to introduce a cue that would not affect others' code.
Our greatest challenges with switching out revolved around finding the best speed and angle for the leader robots to enter/exit without disrupting the flow of movement. This required a lot of trial and error (the clips to the left are representative of what a majority of our earlier trials looked like), but we finally found a good balance, shown in the clip below.
Part V: The Finale
Here is a full clip of our three robots waltzing together!
Footage from April 20th
Main Takeaways
Overall, I thoroughly enjoyed working on this project with my teammates and learned so much! I was given opportunities to refine and build on concepts I learned over the semester and was introduced to new concepts that I hope to explore further in the future. Here are my main takeaways from the project:
-
Don't be afraid to really break down sections and slowly build your way up
-
Integrating hardware and software sometimes feels more like a balancing act than a precise technical process
-
Sometimes a quick redesign of the actual Lego fixes an issue better than changing code
-
Start with simple designs and add on
-
Write/comment code in a way that will let you easily understand and build on in the future
-
Even if you are all working on different sections, being near teammates (whether that be physically or on Zoom) can streamline the design and iteration process
Future
-
Incorporate a way to sense the presence of other robot couples (eg. with ultrasonic sensor)
-
Improve physical build of robots to better integrate with the software (eg. use colors that contrast the color detection)
-
Code the switchout to be more consistent and less dependent on timing
-
Explore various ways robots can communicate position without having to complete complex math or lag systems
-
Keep better track of values that worked in which conditions and find a way to better quantify those differences
Code:
These buttons link to our Github repository.